RX8 Project – Part 13, Canbus #3, Labview!

If you just want the CANbus ID for the RX8 PS light and not all the background work just skip to the end!

So it’s been quite a long time since I had chance to have another go at getting the CANbus on the cluster working and while previously I manged to get everything apart from the power steering warning light working I decided I really should find out why not. This is a simple lesson in why getting sufficient sleep is really important!

I was contacted a while ago buy a guy doing a similar conversion to mine who happened to have a second complete RX8 and a variety of diagnostic equipment that can talk CANbus who had send me a block of CANbus log data that I’ve done nothing like enough work on since I’ve had it! Anyway the key here is I knew that the car some of the logs had come from had the factory PCM (ECU) working as intended and as such the power steering light doesn’t illuminate. This meant that somewhere in that log file was the data that turned off the light, I just had to work out where it was!

Now first off I took the approach of taking the two sets of data logs I had, one from a car with a functioning PCM and one from a car that doesn’t. Then list out all the ID’s that occurred in each set of data. I’m going to assume for my purposes that any that occur in both sets are not required. The logic being that the data that turns off the light must be present in one set and not the other. I admit that this might not be the case if there’s something more complex going on like if with the PCM removed the power steering computer doesn’t get the required data and sends a different value on the same ID. But for now it’s a starting point!

The ID’s that remain are as follows:

201, 203, 215, 231, 240, 250, 420, 620, 630, 650

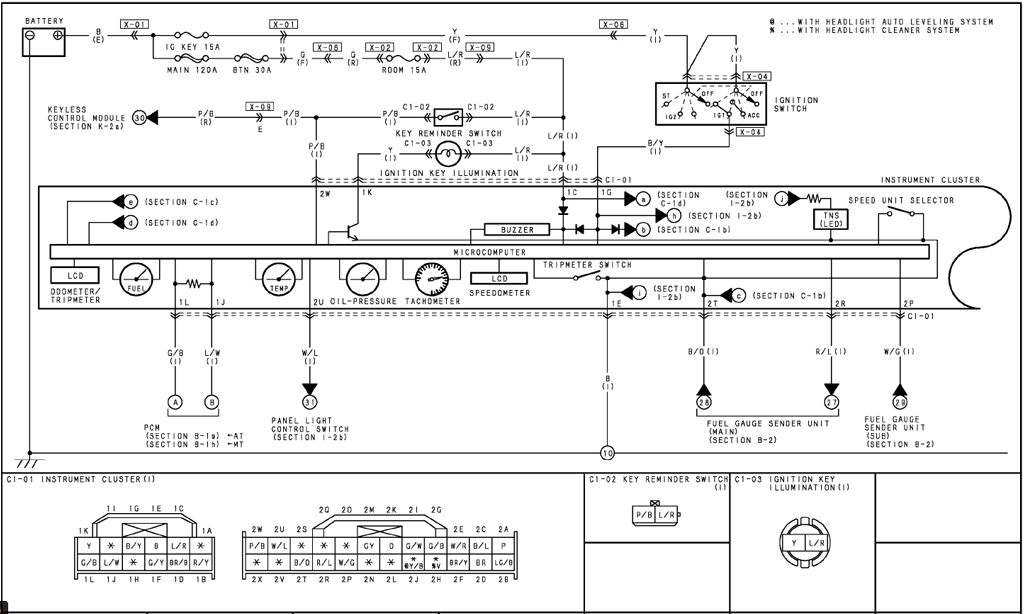
A couple of these we’ve already seen elsewhere, specifically 201, which is the RPM and speed to the dash, and 420 which control the cluster warning lights. So after setting up the arduino and canbus data to strobe all these remaining address and nothing happening I gave up!

Many weeks went by and I it was nagging at me why I couldn’t find the right code. Eventually I decided to try a different tack so I ordered a USBtin which is a really neat little USB to CAN adapter which appears as a virtual COM device in windows and can be controlled using a series of commands known as the LAWCIEL protocol (details of which can be found here). The kit version is really quite cheap and would probably be a good option for the budget conscious but on this occasion I just decided to be lazy and buy the prebuilt one.

Clearly I’ve decided to PC control it at this point! Next up I needed a way to stop it when the warning light went off. I ordered a very cheap optical detector off ebay which can be wired into an Arduino or something similar. These are the ones that vary around £1-2  so difficult to argue with. They offer a potentiometer to adjust the switching brightness so I can tune it to what I need and a digital output so I don’t need to mess about doing analog reads or calibrating things on a microcontroller. Yes i know it’s not the neatest or most efficient way of doing it but for my purposes it’s so cheap and easy it really doesn’t matter! So I need to make that talk to a PC in a way I can use and that’s where this whole thing starts to get more interesting.

I’d pondered ways of interfacing a microcontroller to a PC easily and while it’s not terribly hard to make it shout over serial when an input goes high I came across something much more interesting. There’s a company called National Instruments who make lots of very expensive software and equipment for recording data from experiments but fairly recently they started supporting hobbyists by producing the Labview Makerhub, and more specifically a package called LINX. LINX includes a series of drivers and firmwares to allow things like Arduinos, Beaglebones and even Raspberry Pi’s to be used as IO devices (the Raspberry Pi can actually have programs loaded to them as a full remote node). This is quite a major step because it suddenly allows hobbyists to use really good professional software without having the problem of only being able to use NI’s extremely expensive hardware! This gave me and idea – use labview as the core software then I can use the supplied LINX firmware to set up an arduino as IO. To make this deal even sweeter you can also download Labview for free from NI for home use. Take a look here

So after a quick bit of following the instructions we have a basic labview program that will read the arduino IO via serial:

Labview Lynx1

Basically what this does  is it starts by opening a serial connection via the LINX toolkit, this returns a device name to an on screen string display and passes a reference which identifies the connection to the read stage. The next bit the larger grey rectangle is how Labview handles a while loop so it’ll keep performing the enclosed functions constantly from left to right until the conditional term in the bottom right goes high – in this case it’s a stop button. So basically the loop just calls a LINX channel read of channel 2 where I connected the light sensor to the Arduino. The inner rectangle only executes when the read value is false (i.e. when the light goes off) and while there’s a lot of information recorded here from elsewhere in the program basically if it sees the light go off it records the current ID being tested, the time that has elapsed since the test started. This means we know when it’s right!

Labview is designed to capture data from lab instruments and so there’s a really handy thing called the VISA toolkit that allows blocks of data read and write via the serial port and basically you can just open a port with specified settings then make read and write requests and do things like crop the incoming data at a predefined character. In this case that character needed to be CR (Carriage Return) this is ASCIIcharacter 13 because LAWCIEL terminates everything with one.

Labview Lynx2

For the USBtin we open the correct COM port at 115200,8 Data bits, No parity, 1 stop bit and no flow control. The other thing to note is at the top right, this sets the termination character to the numeric value of CR, the benefit here is you can perform a read of any length and it will automatically break up the data in the buffer so a single read can vary in length but the start will always synchronise  with the read call. Opening the connection in a terminal program for the first time and you’ll see nothing actually happens as such, an OK is signified by a CR so all you see is the cursor move. At this stage we are only connected to the USBtin, not the CANbus. So next, configure the CAN connection, send a value of “S6\r” . The code is S6, this will set the USBtin to 500kbit correct for the dash, the \r is how you indicate a CR in a Labview string. Next I chose to send “v\r” which requests the version from the USBtin, we don’t need this but it gives a solid confirmation it’s talking to us. Next up Z1\r tells the USBtin to timestamp the incoming data, I thought this might be useful but never actually implemented it.

Labview Lynx3

With the setup complete we can start reading data by opening the CAN connection by sending O\r. On a terminal program (assuming you have the CANbus wired up) doing this would result in packets of can data from the cluster appearing. The initial read of length 1 byte reads just the confirmation from the USBtin that it has received the open request. Next is the main read, it’s worth noting the read length is set at 50 bytes but this will be cut short by the termination character set earlier so we can accept varying length CAN data. C\r closes the CAN connection and again another read 1 byte clears the acknowledge. Tacked on the end is a section to read the controller status looking for error states etc. The keen eyed amongst you will notice the majority of this code is conditional, this is because the code needs to insert send requests among the stream of reads. This is because if the data is not read from the USBtin constantly a buffer somewhere fills (I imagine on the USBtin itself but can’t confirm this) and the port crashes. I spent a lot of time finding this out the hard way!

Labview Lynx4This is the write data code, again very similar but it just opens the port, writes whatever string is in the buffer and closes the connection. Once the connection is confirmed closed it resets the Boolean that causes the ‘write’ condition so on the next loop it goes back to reading again to keep the buffer clear. The read loop runs at the maximum possible speed but it is slowed down because it waits for either a termination character or 50 characters to be received before it completes and loops again.

Beyond that the only other bits of code just generate the data for the write buffer using an increment counter for the ID field and toggling between either 8 bytes of FFFF or 0000 every 100ms for 20 cycles and setting the write flag high to send the data..

So after letting this run for a fair while it started spitting out values, specifically the ID 300 for the power steering light. Wait a minute that wasn’t in the list earlier. Yes I know that, that’s where getting enough sleep comes in. Originally I split the data based on whether or not the PCM was fitted and ignored the ones that occurred in both sets, the obvious mistake here is that of course the power steering light isn’t controlled by the PCM, quite logically it’s controlled by the power steering controller!

So there we go, ID 300, the first byte (leading) controls the light, values below 80 turn the light off. Unplugging the PCM causes the controller to send 80 on loop hence the the warning light.

Get data from ID: 4B1
0	0	0	0	0	0	0	0	
-----------------------------
Get data from ID: 81
43	6F	1	4B	
-----------------------------
Get data from ID: 300
80	
-----------------------------
Get data from ID: 231
F	0	FF	FF	0	
-----------------------------
Get data from ID: 430
95	5F	83	0	0	0	60	
-----------------------------
Get data from ID: 81
25	6F	1	4B	
-----------------------------
Get data from ID: 81
16	6F	1	4B	
-----------------------------
Get data from ID: 630
8	0	0	0	0	0	6A	6A

Looking at the log data again we see that ID 300 is getting a value of 80 – this is during the self test before the engine is started. I previously tried sending this data on the original Arduino CAN setup and go no result so what did I do wrong. Again this is based on another assumption, I though the logger was ignoring high order bytes with zero value (ie this value if could be 00-00-00-00-00-00-00-80) well it turns out that was totally wrong, it actually ignores trailing zeros, the value of the can data here should be 80-00-00-00-00-00-00-00.

So while all these hours of work told me one thing I should have already known it’s actually worked out Ok because it highlighted this other problem (read ‘incorrect assumption’ !). This means The odds of me working out all the other data from the logs (that I’d previously written off as not usable) is actually much higher!


RX8 Project – Part 12, Turbos #3 – Flanges

This is a step that most people won’t need to do. Or rather there are usually easier alternatives to! When most people build a turbo manifold they simply buy pre-cut flanges for both the inlet and outlet and weld them onto the ends of whatever intricate bit of welded pipework they have devised and all is well. This is fine for the vast majority of turbos currently available but what if we have one that’s a bit more unusual, say one that most people would never even dream of using for a custom setup. For example the custom housing GT15 turbo used on a diesel Rover from about 20 years ago. That would present more of a challenge! Why do I never make these things simple!

So what we need to do is make some flanges, this isn’t a technically complex task but does take a little thought.

The first step is to carefully measure the size of either the fixed studs (or bolt holes). These are commonly M8 and so the bolt OD will be just under 8mm and if the flange has the holes will be more than the bolt size as they tend to be quite generous to aid alignment. M8 clearance hole might well  be as much as 9mm but note these all down.

Next measure the distance between each of the holes/studs, adding half of each hole/stud diameter on these numbers will give you the distance between the centre of each fixing position. This gives the fixing positions and would allow a template for these to be drawn. If doing the job this way you just need to measure the main port diameter and its distance from the centre of each hole/stud position to the centre of the port. In my case one port was handily central in a triangle so I could just measure half way between each pair of stud and draw a line to the third stud and where they cross the port centre goes.

I also tried another approach which involved taking a thing piece of aluminium and physically imprinting it with the studs using a mallet. This can be handy for really irregular patterns but does mean you don’t have a nice dimensioned drawing to keep, but you do get an aluminium template. Basically you take your aluminium, lay it over the studs and tap it with a mallet. This leaves an impression for all the fixing positions. What you’d normally do here is just drill a small pilot hole where the centre of each stud is to use to mark up your steel. in my case I didn’t want to have to remove the studs from the turbo so I drilled them out full size.

Flange Template

At this stage I used the same method to indent the sheet metal for the port which was then drilled with a 3mm hole for later transfer.

The port mark was critical because the port was the largest hole and most likely to go wrong! After marking it up on the 10mm thick steel plate I was going to use as the flange and looking at my pillar drill I decided I needed a substantial clamp for safety! While I could have bought a suitable clamp kit I decided that since I already owned suitable tee nuts for the bed I could make it safely.

Port Drilling

So this was the final drilling arrangement – and yes that is a hole saw! I feel at this point I should point out that not all hole saws are created equal. Most commonly found at DIY shops are only suitable for wood/plastic/plasterboard and maybe aluminium sheet which not unreasonably are the sort of things used in DIY. Proper tool shops will supply hole saws rated for steel but they will cost a little more the set I used was this one. It’s certainly not the most expensive out there and probably won’t last terribly long with this level of use but it’s rare I use them for anything like this and I can replace the individual saws in the set fairly cheaply.

You need to centre punch where the port centre is to locate then mount the plate onto the drill. Put a smallish drill bit (don’t go really small as you risk breaking it, I started at 3mm but you could easily go a little larger as this isn’t really precise work)  into the chuck and carefully align the punched mark on the plate with the tip. Once you are happy with the location tighten the clamps down. Tighten a little each side at a time if you have an arrangement like mine as otherwise the high pressure on one side will tend to make the place slip out of position during tightening.

Next you need to lubricate! This is absolutely critical drilling metals otherwise you will spend a lot of time either sharpening worn drill bits or trying to extract broken ones! There’s a lot of debate on whats best, for most light work I use WD40 but you will get through it quite quickly as it will tend to vaporise with the heat, this is good in that it helps cool the metal and cutting tool but it must be replaced with more. With deeper holes or larger diameters I tend to use 3in1 as it seems to work well. For the hole saw here I actually started using car gearbox oil, this slows the cutting but protects the tool.

Once you have a pilot hole swap the small drill bit out for the hole saw, make sure you have the speed slow, cover everything in lubricant and gently start to cut. This will take a considerable amount of time, be patient and regularly stop the drill and clear the cut debris away from the saw. Try to avoid using your fingers to do this as the edges can be very sharp. An air compressor is great for this but I have found that cans of computer air duster work pretty well.

Once you have your main port drilled remove the plate from the drill and file back any sharp edges then use your template to mark the centres for all the other holes, these will then need to be centre punched as before and drilled out to size in stages, I went 4mm, 6.5mm, 8.5mm from what I remember. The only critical one being the final size with the earlier steps being arbitrary. If smaller increments are used the cuts are normally quicker and easier but it adds more operations and so will likely take longer. Also I drilled all the stages on a single hole and then moved the plate which adds many more drill changes but you could also drill all the holes to one size then change drills but this has the added risk of the alignment being off which increases the chance of the bit chattering and potentially breaking but can be done if you’re careful. For the level of precision we really need it doesn’t really matter.

Rough Cut Flange

By now you should have something a bit like this! At this stage with the new flange seated in place marking the outside edge of the flange becomes much easier – you simply bolt the flange in place and draw (or even better scribe) round it on the mating side. The flange then needs to be removed and trimmed back to the mark. I rough cut the bulk off this with and angle grinder and then tidied the edges back with a bench grinder. Again working 10mm plate takes a little time but it’s not too bad and the outside edge doesn’t need to be perfect just not look silly or clash with anything and still be wide enough to hold a gasket.

Turbo Flanges

Here’s the result, two respectable looking turbo exhaust inlet flanges. The process for the exhaust outlets was exactly the same but the main port was 55mm diameter rather than 36mm diameter making the process take even longer! If you’re in a hurry get them laser/waterjet cut!

In another entry I’ll be looking at the process of making the custom exhaust gaskets I need to match.


RX8 Project – Part 11, Turbo’s #2 – Wastegates

So now the project is going in the turbo direction I need to be a bit wary with how I do it. The GT1549 turbo’s I chose had positives and negatives. They looked to be exactly the right size for the engine I had, they were fairly common in one form or another and importantly the price was spot on! I still don’t understand quite how but I managed to find someone on eBay with a matching pair of these turbos fully cleaned and rebuilt for £65 each delivered! So that’s the positives, now the negatives, firstly rather than the normal bracket bolted to rear of the compressor housing to hold the wastegate actuator. On these turbos it is actually cast into the housing and so it would make rotating the housing to fit the application considerably more difficult. The second problem is they have a factory fitted actuator which isn’t adjustable more than a small amount and I really didn’t want to start tweaking a completely untested engine with no idea what was going to happen with no way of keeping the boost below the 18 psi wastegate pressure!

So getting over these problems. Having looked at the rotation problem I came to the conclusion I should be able to make them both fit with no rotation changes needed. The backup plan here was to grind off the cast in mount and custom make a bracket using a bit of steel plate if it turned out I needed to later on. This takes us to the wastegate problem. I looked at a number of ways of providing a reduction in the actuator pressure including adding springs to the rod side of the actuator and even bolting the internal wastegate solid and fitting external wastegates to the manifolds I came to the conclusion the only real way of giving a wide but reliable range of adjustment while keeping the package as small as possible would be to replace the stock actuator with an aftermarket adjustable one.

Now this is where the plan goes a bit wrong about – after looking about for ages to find a sensible option at a half sensible price the best I could come up with was this : Kinugawa Actuator 

Kinugawa Actuator

I’m under no illusions here, this is a a cheapo unit! But I strongly object to spending the cost of the car on each wastegate. The problem is even though I got these for £68 each which really is very cheap they actually cost more then the pair of turbos! Considering all this it’s still a pretty good option because it is a ‘universal’ version. It comes with a range of springs for different pressures so I can start at just a few psi and swap the springs out as needed and also comes supplied with four different actuator rods.

So here we are – actuators!

Kinugawa Package

So at first glance they look ideal, but don’t let that fool you! There’s a couple engineering problems to overcome.

Actuator Flap clash

The first problem is this; the hole in the supplied rod end isn’t large enough for the flap actuator on the turbo. The solution is simply to drill this out to fit. I didn’t note the sizes, but it was a standard drill size.

Next up was that this ‘universal’ actuator was never really intended for a turbo this small and as such the shortest actuator rod is too long to allow the wastegate flapper to close so I had to modify that as well. The rods are nominally 6mm diameter but the end the rod end has a fine pitch thread meaning modifying that would need me to buy a fine pitch die to extend the thread. Luckily the end that goes into the actuator is a standard M6x1mm metric thread so that was the easier option.

Modified Actuator Rod

I measured how much I needed to shorten the rod to allow the flapper to just close at one end of the rod ends adjustment. The opening pressure of the actuator is set by preload so the more it is tightened greater the boost pressure. I then simply cut the thread down to the required point and then trimmed off the excess. The good news is if I made the rod too short I three more tries for each one!

Modified Actuator Rod

And here is the difference – it’s actually about 25mm less than it started out! Reassemble the whole thing and magically it now fits where it needs to!

GT15 Kinugawa actuator

The other thing you will need to do potentially at this point is change the spring. Once the actuator rod is in the actuator this is actually not too bad but be a bit fiddly. First of position the actuator so the rod is sticking downward between the jaws of a vice. Tighened the vice to hold the rod in place then undo all the housing screws. Lift off the top housing and carefully remove the diaphragm underneath. Next you need to carefully release the rod to take the load off the spring. then you just unscrew the rod and take the aluminium piston and the spring underneath out the housing. Reassembly is just the reverse but the key is to put tension on the rod again and clamp it in place again before refitting the diaphragm and cap otherwise it’s very difficult to get the diaphragm correctly positioned without any wrinkles that could cause damage or leakage.

So now we have two turbos with adjustable wastegate actuators with a potential working range covering something like 3-30psi!


RX8 Project – Part 10, Turbo!

So this is about the time this whole project started getting a bit out of hand, when I decided I was going to need more power…significantly more.

I looked into what options I had –

Option 1 – I could stay naturally aspirated and probably skim the head to increase compression a bit and get more out of it but tuning in this way can be very intricate and looked to be more involved than I wanted for the amount of power I could expect.

Option 2 – Supercharger, there are a few options here. Realistically the most common supercharger these days the Eaton M45 found on the modern Mini cooper S is just too small for this so sticking with the positive displacement type we can get an M62 from a mercedes CLK230 and with the right pulley ratio it would probably be ideal for moderate improvements. For real degrees of silliness an M90 might well be needed and these are a little harder to find.

Option 3 – Turbo, this gives a huge amount of options due to the prevalence of turbo engines at the moment and would give potential for significant power gains comparatively cheaply and without needing to align belts.

After debating for a very long time the best way to go for a road car I settled on option 3 primarily for the simplicity aspect – I know very little about the intricacies of high compression engines and I know superchargers require a level of alignment very difficult to achieve with DIY manifolds! The next obvious question is how much power? Well following finding out from Noble that the rods in the engine fold up at something a bit over 300bhp I decide that from a cost and complexity point of view I’d aim for about 280bhp as a limit so I could keep the amount of parts I needed to a minimum – famous last words!

Now there’s a huge online argument about whether two smaller turbos or a single larger one gives the best throttle response and performance. This isn’t an argument I want to get into but in my case I decided twin turbo was the way to go for two reasons. Firstly because I could close mount them under the engine to keep the overall engine package as small as possible and so simplify the pipework on the exhaust side. Secondly because due to the government publicising the benefits of diesel there are now loads of small cheap turbos about for very little money..

Getting into sizing most of the information is that Noble used two T25 turbos. Taking a look at http://www.boosttown.com/forced_induction/air_amount_calculator.php

We can see that for this engine at 6000 rpm and 0.7 bar of boost we need about 27 lbs/min of total airflow. Next we need the T25 Map for a common inducer size:

T25 Compressor map

Looking at the map for the normal T25 turbo we can see that with two turbos to share the load and so only needing about 13.5 lb/hr at 1.7 pressure ratio the turbo is right in its optimal zone. Not a bad choice all in all but these are old design turbos and as a twin turbo configuration the actual  amount of available exhaust will be limited so the turbo may not spool until a bit high up the rev range so I started looking at other options which would give a good improvement across a wider rev range. To achieve this a smaller exhaust housing was needed and this is where the diesel engines come in. Turbos used for diesel engines tend to have smaller exhaust housings for this very reason and they’re abundant. This led me to the GT1549, this is a manufacturer specific version of the GT1548 turbo, people have reported them to be good for 180-200bhp which is right in the area we want.

GT1548 Compressor Map

In many ways a similar map to the T25 but the spindle speeds are noticeably higher. The unit as a whole is much smaller but will have less weight in the rotating components and as a result of the smaller exhaust housing the turbo should generate boost at lower RPM. I used to have a map for the exducer which confirms this but have since misplaced it. Now before anyone tells me “you can’t use a diesel turbo on a petrol” consider this – this same turbo was used on both a huge range of diesel engines but also on the Saab 9-5 V6 petrol. That said there is also a VNT version of this turbo (GT15xxV), VNT turbos don’t last long on petrol engines by all accounts.

So here we are, the turbosGT1549 x2 :

So there you have it, a short post but a complete change in the direction of the project from where it started off and we’re only just getting started!


RX8 Project – Part 9, Flywheels Part 3

So just to finish of the flywheel section here are the the finished custom parts :

Flywheel spacer on the crank, you can see the black dust seal in the centre covering the new pilot bearing underneath.Duratec V6 Crank Spacer

A wider shot showing the spacer in position among the currently disassembled state of the engine.Duratec v6 Flywheel spacer

And finally the flywheel itself.

Custom Duratec v6/RX8 Flywheel

In this photo the ring gear and location dowels for the clutch basket have been fitted.

The ring gear was actually a lot easier to fit than it was to remove because you can just put the ring gear in the oven (at maximum, in my case 250°C+ off the end of the scale!) and put the flywheel in the freezer for an hour or so as well – this may not actually be necessary but you want the most possible room between the parts when you fit them together. If the ring gear snags on the way down it because there isn’t quite enough space it can be a real pain to get it off again. Before installing the ring make sure it is the correct way round – all the teeth should have a bevel on one side to help the starter engage cleanly this goes towards the position of the starter motor! Take the hot ring out the oven, check it and drop it into place as quickly as possible but make sure it’s right and fully seated to the shoulder of the flywheel. Once touching the flywheel the ring will cool rapidly and lock in place.

The dowels in question turned out to be the wrong size, I specified them as 1/4″ diameter (6.35mm) and this is what is still shown on the drawing but it turns out the ones I measured had more rust than I thought and the holes in the clutch basket are actually designed to locate on 6mm dowels – something I really should have checked! From what I have since found out this is likely one of the many Ford engines which have special dowels which are  (from what I can find out) 8mm on the flywheel side but only 6mm on the clutch side. The correct dowels are actually 6.30mm on the smaller diameter so my original measurement wasn’t actually too far off, I just shouldn’t make daft assumptions! Larger end is 7.97mm diameter by 6.5mm long on the ones I have, overall length is 18mm. Tolerances and fits are not my strong point but I’ll probably start with a 7.9mm drill and hope to press fit them.

For simplicity I recommend buying something like this available via eBay as Cosworth clutch dowels by x-power engines:Xpower Flywheel Dowels

I’m planning to modify the appropriate holes on the flywheel to use the correct dowels I just haven’t quite got round to it yet!

I should probably also take a moment here to mention flywheel bolts. The Duratec crank has a slightly unusual thread which is M10x1.0mm (M10 Extra fine). This is as it happens the same thread commonly used on brake hydraulic components like bleed screws. Needless to say the stock bolts are far too short as the engine originally just had a thin flex plate so longer bolts were needed. Now various companies will sell flywheel bolts for almost any engine but not for something like this and they rarely specify the actual sizes of the bolts in a kit so I can’t just buy one for something else that will fit very easily. My solution was find the best standard bolt I could and so I am using some 12.9 high tensile socket cap bolts which I managed to find from a bolt supplier on eBay with the right thread. For anyone who doesn’t know 12.9 rated bolts are the highest rating before getting into one off special items (usually using exotic materials) and they really are very strong. As a comparison ARP gives their flywheel bolts as having a tensile strength of 180,000 PSI. The 12.9 bolts are rated to have a minimum tensile strength of 176,900 PSI – a number close enough it makes me think they are likely the same material! The strength figures for these bolts mean at the size I will be using each bolt can be safely loaded to in excess of 7000kg of tensile load indefinitely with no deformation. Their failure point being somewhere north of 9500kg each! Some time in the future I will do a full write up of nuts bolts and other fixtures it’s worth knowing about.

So that’s my shiny custom flywheel, next time you see it it should be bolted to a rebuild engine with a whole host of custom or cobbled bits on it!

RX8 Project – Part 8, Flywheels Part 2

Apologies for the long delay since my last post (more than a month!), life has been getting in the way of having time to do anything on blog of late. The good news is that the RX8 project has made some progress and this blog is still no-where near the current status so there’s still plenty to come!

In flywheels part one I mentioned how I ended up in a situation where I didn’t really think the cast flywheel was save to modify and how a chance encounter led me to a solution. The problem it presented is I’m primarily an electrical/electronic engineer, while I dabble fairly extensively in mechanical things designing a flywheel isn’t exactly something that comes up every day and the precision was critical so I spent a lot of time making sure I got it right!

Critical aspects as I saw them were the bolt pattern to match the crank, bolt points for a suitable clutch and and very accurate outer diameter to allow fitment of the RX8 starter ring gear.

Looking at these criteria one at a time the bolt pattern is an interesting one. At first glance all the 8 bolts appear to be evenly spaced around the crank on a PCD (Pitch Circle Diameter – this means the centre of each of the holes is placed on a circle). After checking my early flywheel model drawings against the real flywheel I noticed that all the bolts lined up except one which was just slightly wrong; ok, approximately 2mm, enough to be considered very wrong! Duratec V6 Crank Alignment

This suggested the pattern wasn’t exactly what I thought so I started checking exactly what the error was in different directions to figure out what was going on. After extensive measurement I managed to work out what was wrong, the bolts were indeed on a PCD they just weren’t evenly spaced. For even spacing the bolts would be at 45° intervals but one hole was shifted 4° round the PCD so it was 41° and 49° to the two nearest holes. Combined with a 76mm PCD this made the bolt pattern line up perfectly. This is actually quite useful because it means when the crank/flywheel are balanced they cannot be reassembled in the wrong alignment.

The crank also features a location register to make sure the centre of the flywheel is perfectly centred on the crank. The register is a raised lip accurately machined to a specific outer diameter so there is no lateral slop between the parts, in this case I measured this to be 44.40mm in diameter. when I trial fitted this it needed some emery on the crank to fit but this seemed due to surface rust where the engine had been stored in a damp room for a long time. Your mileage may vary!

Next up we had the clutch, I initially planned on using the RX8 clutch as I thought it would be stronger and have more options later but on further research it turned out RX8 clutches are very expensive indeed and anything other than a stock one gets very expensive very quickly and largely need to be imported so I started looking at other options. This took me back to the idea of using a Mondeo 240mm clutch, they’re cheap, readily available and the stock ones will handle a fair amount of power. Admittedly a stock kit is highly unlikely to last long with the amount of power this project could get to but there are readily available uprated covers and plates that could be used. Plus £50 on a project that may never really work isn’t too bad, £300 for a new RX8 stock clutch is more than the car cost! I also already head the factory Mondeo flywheel to take all the appropriate dimensions from which kept the process fairly simple.

The last issue was the ring gear, this is critical because the RX8 has its starter motor on the gearbox side and when because of this the options are either re-use the RX8 starter or butcher the RX8 bellhousing to allow an engine side starter to fit. For simplicity I figured I’d go with the RX8 starter since I was getting the flywheel made anyway. Starter ring gears are whats called an interference fit on the flywheel. In essence the ring gear is intentionally slightly smaller than the flywheel it is designed to fit onto and when the two parts are either pressed or heat fitted (heating up the ring so it expands and can be slipped into place) together. It is a tiny change in size when fitted and just the friction between the two parts that prevents the ring gear slipping when the engine is started hence why this is rather critical. To simplify this I modelled a nominal 290mm for the diameter of the lip this mounts on but supplied the ring gear to the machine shop and asked them to machine to an interference fit. This led to the following design:

RX8 Flywheel V6 – Machining Drawing

After a lot of double checking with these base measurements I needed to get the correct offset from the crank to make sure the clutch plate is in the correct position to be fully engaged with the gearbox splines. This led to me modelling everything to make sure it would all fit where it needed to:

RX8-V6 Clutch AssemblyHere you can see how everything stacks up. Between the bell housing and engine there is a 10mm spacer (grey) this represents the adaptor plate thickness. Clearly the bell housing has been simplified but the overall length is correct and the position of the splines (a little hard to see in the picture) and pilot bearing diameter (the reduced diameter) on the gearbox input shaft are correct.

Unfortunately having got all of this looking right and sent it over to the machinist and work starting on it I realised a couple minor mistakes, one was that I’d not offset the flywheel to match the spacing of the bell housing caused by the adaptor plate (shown above but this picture is from a later version) but related to that I hadn’t checked the offset to make sure the starter ring gear was actually in the right position to engage with the starter!

Turned out it was a little off and actually needed more offset but unfortunately the raw material for the flywheel had been delivered and machining had already begun and sadly it wasn’t big enough to allow for this extra thickness so I needed a new plan. The best I could come up with was to add a small spacer to correct this. Luckily this also allowed an opportunity to include a new pilot bearing location. This is a bearing that locates into the end of the crank to support the engine side of the gearbox input shaft and due to the gearbox adaptor plate thickness and the fact of it being a mismatched engine and gearbox the standard bearing was now too far away to support the shaft.

RX8 V6 Crank Spacer V1

This spacer corrects the problems above and still includes the correct bolt pattern, location diameters to keep everything centred. The 35mm internal diameter is the exact size of the bearing I used. This allowed a suitable bearing and a dust seal to be pressed into place and likely stay there, that said there’s a lip in the spacer to hold the bearing up and once the gearbox shaft is in place it physically can’t fall out. It’s probably worth pointing out here that this bearing only actually moves in use when the clutch is pressed, when driving along in a gear the clutch locks the crank and input shaft together and so the bearing is rotating overall but the inside and outside are rotating at the same speed so the vast majority of the time it shouldn’t experience any wear.

The final product to be coming in part 3!


RX8 Project – Part 7, Introduction to flywheels

Having decided what engine I was going to use and deciding to keep the existing gearbox so I could retain the factory carbon prop shaft the next logical step was to work out how exactly to achieve that…

First off the engine I had bought was from an automatic and so had a flex plate rather than a flywheel. This is a comparatively thin piece of steel which gives the starter ring gear, which would be on the outside of the flywheel on a  manual, a fixing point and also mates the torque converter to the crank. In automatics the torque converter provides the rotating mass to smooth the engine pulses. So the first step was to get a flywheel that would work. My first idea was to take the factory RX8 flywheel which has quite a deep offset (i.e. it is quite dished) which would help correct for gearbox adapters which would space the gearbox off the engine. So I looked into simply machining off the back of the RX8 flywheel flat and drilling the bolt pattern from the V6 crank into it. While technically this would work there are a few problems.

RX8 V6 Flywheel Mod

(Taken from here : http://www.locostbuilders.co.uk/viewthread.php?tid=185939&page=2)

The image above shows exactly what I’m talking about, this is a factory RX8 flywheel modded onto a V6 crank. I believe the engine used in this case is the Mazda KLDE. While this all looks good there are a couple of issues. First is that the RX8 flywheel isn’t balanced as it stands, it forms a balanced arrangement with the rest of the engine and so needs modifying. I don’t have a picture of this but the weighted lip on the rear ranges from thin on one side to very thick the other. Aftermarket flywheels get round this by using balanced flywheel and a separate counterweight. Problem two is that the factory flywheel is cast iron, this has an irregular structure and can have flaws and other weaknesses from new but parts are generally made with a factor of safety to account for this but modification in this way will remove some of this additional strength and change areas of stress. I actually 3D modelled this change to see if it would work:

Original:

RX8 Flywheel Bottom OldRX8 Flywheel Top Old

Modified:

RX8 Flywheel Bottom NewRX8 Flywheel Top New

Having modelled this I performed a stress analysis of this based on the force created by the flywheel spinning at 8000 RPM. This is more than redline as it stands but it seemed prudent to plan ahead! It turns out the stock flywheel is only about 20% stronger than required based on the nominal ‘standard’ properties of cast iron. The new version would be below strength at this speed, dropping to 7500 RPM gave something around 102% strength. Not a number I felt confident in at all! Just to make a point here as people argue the safety of modded flywheels a lot (mostly from “I’ve done it and it’s fine”). I’m not saying it will fail modded like this, in fact the numbers suggest it is (just) strong enough here but there is no margin for error even on the ‘ideal’ material and cast iron does vary significantly. A given flywheel might be fine like this for years, but get a weaker one or one with a flaw or even give it a hard jolt when it’s at full revs and it may just shatter. If it does, be somewhere else!

So after deciding the mod wasn’t really the best idea I realised that all I needed was a flywheel that would bolt up and work. A fairly easy task at face value since it turned out the the standard Ford clutch splines (1″ dia, 23 spline) match the gearbox the solution suddenly seemed simple and I just needed a stock Ford flywheel and clutch for that engine. It turns out there were a few variations of the Ford flywheel depending if you went for an ST200, ST220 or just a vanilla V6 Mondeo but the difference between them seems to be some are ‘lighter’ versions to make the more special cars rev a little more freely. This is achieved by leaving out sections of the outer lip on the flywheel. In my case I had no idea if this project would ever work so I bought the cheapest! This is when another problem emerged:


Mondeo Vs S-Type Starter

Note the starter ring gear on each. The top is the S-Type flex plate, the bottom is the Mondeo one. It seems the Ford and Jag use a different starter motor as well. Add to this that the Mondeo flywheel puts the clutch far too far forward to mate to the gearbox and because the starter is on the engine side on the Jag but on the top of the gearbox on the Mondeo (because it’s transverse) – something we can’t do on the RX8 as the gearbox is wrong and there isn’t the room in the tunnel the whole idea falls apart! Modifying the cast one seems to be the only sensible option.

Around this time I happened to have a chat with a colleague at work who is a professional mechanical engineer and 3D designer I know through the job I had at the time and explained the problem and he directed me towards a machinist who did a lot of work for him and was well into cars. By chance a few days later this machinist came into the office and as soon as I explained the problem he just said “ah, we’ll just make you a custom one if you do a design”…. So I found myself with the challenge of designing a custom flywheel which as per the machinists recommendation would be made out of EN24 steel. As a comparison changing the models above to EN24 changes the safety factor to something around 300% from memory meaning we can lighten it significantly later if required and not risk weakening it dangerously.

More to come…

RX8 Project – Part 6, Canbus #2

So now we have a powered up RX8 cluster and some Canbus hardware that we can talk to we can start doing a few interesting things with our new setup.

Fire up the Arduino IDE and we can start writing our basic controller code. Canbus devices have a device address and a memory location for all the required data so we need to work all of these out. This is a lot easier for digital IO than the more complicated analog values because digital IO are just either set bit on or off whereas analog values can have funny scaling and things going on. I initially used a canbus demo program which worked because I basically cloned the Arduino Canbus shield. Plenty of starter guides and information can be found here : https://learn.sparkfun.com/tutorials/can-bus-shield-hookup-guide

My initial approach involved setting the target address for the Canbus transmission and sending patterns of bits high and low and see what happens. Google told me that the cluster Canbus interface operates on 500 kHz clock so with that information we should get a connection.

#include <Arduino.h>
#include <mcp_can.h>
#include <mcp_can_dfs.h>

#define CANint 2
#define LED2 8
#define LED3 7

MCP_CAN CAN0(10); // Set CS to pin 10

void setup() {
 // put your setup code here, to run once:
 Serial.begin(115200);
 Serial.println("Init…");

Serial.println("Setup pins");
 pinMode(LED2, OUTPUT);
 pinMode(LED3, OUTPUT);
 pinMode(CANint, INPUT);

Serial.println("Enable pullups");
 digitalWrite(LED2, LOW);
 Serial.println("CAN init:");
 
 if (CAN0.begin(CAN_500KBPS) == CAN_OK) 
 {
 Serial.println("OK!");
 } 
 else 
 {
 Serial.println("fail :-(");
 while (1) 
 {
 Serial.print("Zzz… ");
 delay(1000);
 }
 }

Serial.println("Good to go!");
}

unsigned char offarray[8] = {0, 0, 0, 0, 0, 0, 0, 0}; // Always Off Array
unsigned char onarray[8] = {255,255,255,255,255,255,255,255}; // Always On Array

void loop() {
 // put your main code here, to run repeatedly:

for (int i=0; i <= 512; i++){ 
  for (int l=0; l <= 10; l++){  
    for (int j=0; j <= 100; j++){
       CAN0.sendMsgBuf(i, 0, 8,offarray);
       delay(10);
     }

     for (int k=0; k <= 100; k++){
     CAN0.sendMsgBuf(i, 0, 8,onarray);
     delay(10);
     }
   }
  }
}

So this loop will iterate through 512 addresses strobing all 8 bytes high and low on 1 second intervals. The trick here is that canbus needs regular packets to stay active, so we can’t just send a value once. In this case each value (high or low) is send 100 times at 10ms intervals so the cluster should stay active long enough to see if anything is happening. Each address will get 10 cycles of high and low before moving onto the next address. In concept this would work and provided ‘i’ is set to increment high enough you would cover all the addresses. Bear in mind at this rate you’d have to watch it for about 90 mins…

Thankfully around the time I started running though this trying to find any useful addresses I came across this :

https://www.cantanko.com/rx-8/reverse-engineering-the-rx-8s-instrument-cluster-part-one/

This nicely tied in with the hardware I was working on and so the code and information is all exceedingly useful and saved me a lot of time. Specifically it gives the address locations for most of the indicators on the cluster which is what we really need.

After lots of trial and error I managed to come up with a block of code that can control the cluster but easily allow me to set any warning light I need on the dash, or more accurately also to turn off all the warning lights. Something that will be essential come MOT time as a warning light that stays on is an MOT fail and since most of the systems that control them will no longer be in the car (primarily the original ECU).

#include <Arduino.h>
#include <mcp_can.h>
#include <mcp_can_dfs.h>


#define COMMAND 0xFE
#define CLEAR 0x01
#define LINE0 0x80
#define LINE1 0xC0

#define CANint 2
#define LED2 8
#define LED3 7

#define NOP __asm__ ("nop\n\t")

// Variables for StatusMIL
bool checkEngineMIL;
bool checkEngineBL;
byte engTemp;
byte odo;
bool oilPressure;
bool lowWaterMIL;
bool batChargeMIL;
bool oilPressureMIL;

// Variables for PCM
byte engRPM;
byte vehicleSpeed;

// Variables for DSC
bool dscOff;
bool absMIL;
bool brakeFailMIL;
bool etcActiveBL;
bool etcDisabled;


MCP_CAN CAN0(10); // Set CS to pin 10

void setup() 
{
    
    //Serial.begin(115200);
    //Serial.println("Init…");
    //Serial.println("Setup pins");
    
    pinMode(LED2, OUTPUT);
    pinMode(LED3, OUTPUT);
    pinMode(CANint, INPUT);

    //Serial.println("Enable pullups");
    digitalWrite(LED2, LOW);
    //Serial.println("CAN init:");
    
    if (CAN0.begin(CAN_500KBPS) == CAN_OK) 
    {
        //Serial.println("OK!");
    } 
    else 
    {
        //Serial.println("fail :-(");
        while (1) 
        {
            //Serial.print("Zzz… ");
            delay(1000);
        }
     }

Serial.println("Good to go!");
}

unsigned char stmp[8]       = {0, 0, 0, 0, 0, 0, 0, 0};                         // Always Off Array
unsigned char otmp[8]       = {255,255,255,255,255,255,255,255};                // Always On Array

unsigned char statusPCM[8]  = {125,0,0,0,156,0,0,0};                            // Write to 201
unsigned char statusMIL[8]  = {140,0,0,0,0,0,0,0};                              // Write to 420
unsigned char statusDSC[8]  = {0,0,0,0,0,0,0,0};                                // Write to 212

unsigned char statusEPS1[8] = {0x00,0x00,0xFF,0xFF,0x00,0x32,0x06,0x81};        // Write to 200 0x00 00 FF FF 00 32 06 81
unsigned char statusEPS2[8] = {0x89,0x89,0x89,0x19,0x34,0x1F,0xC8,0xFF};        // Write to 202 0x89 89 89 19 34 1F C8 FF

unsigned char statusECU1[8] = {0x02,0x2D,0x02,0x2D,0x02,0x2A,0x06,0x81};        // Write to 215 - Unknown
unsigned char statusECU2[8] = {0x0F,0x00,0xFF,0xFF,0x02,0x2D,0x06,0x81};        // Write to 231 - Unknown
unsigned char statusECU3[8] = {0x04,0x00,0x28,0x00,0x02,0x37,0x06,0x81};        // Write to 240 - Unknown
unsigned char statusECU4[8] = {0x00,0x00,0xCF,0x87,0x7F,0x83,0x00,0x00};        // Write to 250 - Unknown


/*

215 02 2D 02 2D 02 2A 06 81 // Some ECU status

231 0F 00 FF FF 02 2D 06 81 // Some ECU status

240 04 00 28 00 02 37 06 81 // Some ECU status

250 00 00 CF 87 7F 83 00 00 // Some ECU status

*/


void updateMIL()
{
    statusMIL[0] = engTemp;
    statusMIL[1] = odo;
    statusMIL[4] = oilPressure;
    
  if (checkEngineMIL == 1)
  {
    statusMIL[5] = statusMIL[5] | 0b01000000;
  }
  else
  {
    statusMIL[5] = statusMIL[5] & 0b10111111;
  }
   
    if (checkEngineBL == 1)
  {
    statusMIL[5] = statusMIL[5] | 0b10000000;
  }
  else
  {
    statusMIL[5] = statusMIL[5] & 0b01111111;
  }

   if (lowWaterMIL == 1)
  {
    statusMIL[6] = statusMIL[6] | 0b00000010;
  }
  else
  {
    statusMIL[6] = statusMIL[6] & 0b11111101;
  }

     if (batChargeMIL == 1)
  {
    statusMIL[6] = statusMIL[6] | 0b01000000;
  }
  else
  {
    statusMIL[6] = statusMIL[6] & 0b10111111;
  }

       if (oilPressureMIL == 1)
  {
    statusMIL[6] = statusMIL[6] | 0b10000000;
  }
  else
  {
    statusMIL[6] = statusMIL[6] & 0b01111111;
  }
}

void updatePCM()
{
    statusPCM[0] = engRPM;
    statusPCM[4] = vehicleSpeed;
}

void updateDSC()
{       
  if (dscOff == 1)
  {
    statusDSC[3] = statusDSC[3] | 0b00000100;
  }
  else
  {
    statusDSC[3] = statusDSC[3] & 0b01111011;
  }

    if (absMIL == 1)
  {
    statusDSC[4] = statusDSC[4] | 0b00001000;
  }
  else
  {
    statusDSC[4] = statusDSC[4] & 0b11110111;
  }

      if (brakeFailMIL == 1)
  {
    statusDSC[4] = statusDSC[4] | 0b01000000;
  }
  else
  {
    statusDSC[4] = statusDSC[4] & 0b10111111;
  }

     if (etcActiveBL == 1)
  {
     statusDSC[5] = statusDSC[5] | 0b00100000;
  }
  else
  {
    statusDSC[5] = statusDSC[5] & 0b11011111;
  }

    if (etcDisabled == 1)
  {
    statusDSC[5] = statusDSC[5] | 0b00010000;
  }
  else
  {
    statusDSC[5] = statusDSC[5] & 0b11101111;
  }
 

}

void loop() 
{
    // StatusMIL
    engTemp         = 145;
    odo             = 0;
    oilPressure     = 1;    // Either 0 (fault) or >=1 (Ok)
    checkEngineMIL  = 0;
    checkEngineBL   = 0;
    lowWaterMIL     = 0;
    batChargeMIL    = 0;
    oilPressureMIL  = 0;

    updateMIL();
    CAN0.sendMsgBuf(0x420, 0, 8, statusMIL);
    delay(10);


    // StatusPCM
    engRPM          = 60;    // RPM  Value*67 gives 8500 RPM Reading Redline is 127
    vehicleSpeed    = 93;    // Speed  Value=0.63*(Speed)+38.5

    updatePCM();
    CAN0.sendMsgBuf(0x201, 0, 8, statusPCM);          //CAN0.sendMsgBuf(CAN_ID, Data Type (normally 0), length of data, Data
    delay(10);

    // StatusDSC
    dscOff          = 0;
    absMIL          = 0;
    brakeFailMIL    = 0;
    etcActiveBL     = 0;    // Only works with dscOff set
    etcDisabled     = 0;    // Only works with dscOff set

    updateDSC();
    CAN0.sendMsgBuf(0x212, 0, 8, statusDSC);
    delay(10);

/*
    CAN0.sendMsgBuf(0x200, 0, 8, statusEPS1);
    delay(10);            

    CAN0.sendMsgBuf(0x202, 0, 8, statusEPS2);
    delay(10);    
           
    
    CAN0.sendMsgBuf(0x215, 0, 8, statusECU1);
    delay(10);  

    CAN0.sendMsgBuf(0x231, 0, 8, statusECU2);
    delay(10);  

    CAN0.sendMsgBuf(0x240, 0, 8, statusECU3);
    delay(10);  
    CAN0.sendMsgBuf(0x250, 0, 8, statusECU4);
    delay(10);  

*/
            
 }

This is the current latest version of the code I have, the serial comms section at the start is handy for checking you have a working connection but if you don’t have the serial monitor open it will cause the Arduino to hang at the transmit instruction and not get as far as updating the canbus so I recommend enabling these initially but once you get a working connection comment them back out as above. There are also sections above taken directly from the Cantanko page to deal with the power steering controller and some other bits, I haven’t tried these yes as the cluster isn’t in a car but I plan do so at some stage.

This code has some limitations in this form, basically the warning lights etc are set in the code as static values so this code will just set everything normal and all the lights I have addresses for to off. One particular curiosity is the way the cluster treats the oil pressure value. The data space actually has a whole byte for a value here but the cluster only only has two values despite having an actual gauge, a value of 0 drops the needle to the bottom, a value of 1 or more sets the gauge to normal. My feeling on this is the car was originally intended to have a proper oil pressure transmitter but someone decided it was too expensive and a normal pressure switch was used instead and rather than redesign the cluster they just changed the scaling in the on board microcontroller to behave as described. long term I’d love to mod the cluster to add the analog functionality back in but without the code for the controller this would probably involve disconnecting the original drive to that gauge and adding another Arduino inside the cluster just for driving that gauge. It seems like a lot of work to know oil pressure on a scale of low to high!

The code also sets a speed and RPM however the ODO and trip meters will not increment as it stands – I purposefully left this bit of code out because it’s only really applicable if you’re on an actual car otherwise your cluster will just keep clocking up. The ODO and trips seemed to be the one bit no-one else had managed to do or identify but after quite a few hours of testing  random blocks will various combinations of high and low as well as sending incrementing / decrementing values I noticed my trip meter had actually moved up by 0.1 miles which meant something was working. I eventually managed to trace it to the address listed above. The trick to actually making it work is that the value in the byte is irrelevant to what the cluster displays, so no this doesn’t let you clock it back! What it appears to do is counts the changes to the value so I made it work by setting up a loop of code that keeps changing this value up to a certain number to give a specific distance. Turns out the cluster needs to see 4140 changes per mile. Eventually I plan to tie this in to the speedometer value so only one value needs to be set, by knowing the pulses per mile and the speed we can work out the time delay between each change. As an example at 100mph we need to send 115 changes per second, this is one every 8.7ms which is obviously faster than the loops above and so for speed and accuracy would have to be hardware timed with an interrupt to do the update at the right speed. I’ll probably do an updated version at a later date.

There’s a couple other things I need to sort out, the airbag warning light being the prime one because this is an outright MOT fail. Now in theory when it’s back on the car it should work just fine as the airbag wiring is all there but I figured it was worth working out anyway. So after working through all of the RX8 cluster wiring diagrams (1)(2)(3)(4) I pieced this together :RX8 Cluster Pinout

This covers the majority of everything someone might need to use the cluster on a simulator apart from the fuel gauge. The RX8 fuel gauge is a bit of an oddity because the car uses a saddle shaped fuel tank to allow it to clear the driveshaft and so it has two senders denoted as ‘main’ and ‘sub’.

RX8 Fuel System Senders

Each of these apparently has a resistance value of between about 325Ω at the bottom and 10Ω at the top. There seems to be some questions about how this system works out what to display based on the two sender values and whether it expects to see one remain full while the other empties or something similar. Unfortunately I’ve not played with it much because I’ve don’t actually need to make this work off the car (since the car will have the senders but I can say putting 100Ω a resistor between both 2R-2P and 2R-2T gives a value of about 1/3 of a tank and 9Ω (because I just added a 10Ω on along side the existing 100Ω) across these connections gives a full tank reading  (actually a little above full) so as long as you move both together it works fine, this is ok if all you want to do is get the fuel warning light off for a driving simulator but not that helpful for a single fuel sender conversion which is why most people are interested. If I get chance I’ll investigate further. Also for some reason it takes an absolute age to move up the scale which is a bit unfortunate but I suspect is as intended. At least it should be stable!

All of that leaved us with just one light I can’t get to turn of, the warning light for the electronic power steering. This is controlled via canbus by the look of the circuit diagram but as yet I’ve not found the address for it. If anyone knows the address please leave a comment! Else I will have to go back to either trial and error or the really dodgy backup plan which involves cutting the tracks in the cluster and doubling up on another warning light which isn’t used much! Maybe I should just add another controller in the cluster!

So hopefully that gives you (almost) everything you need to know about making the cluster work! We might get back to mechanical things in the next update…

RX8 Project – Part 5, Canbus

Following the decision to go for the complete engine swap I had the sudden realisation that nothing was going to work on the car because I wouldn’t have the factory engine and so also wouldn’t have the factory ECU and so no engine data and nothing on the instrument cluster. So I needed to come up with a better plan!

Initially I intended to open up the stock instrument cluster and replace the normal controller circuits inside the cluster with a microcontroller (probably an Arduino) with suitable supporting electronics such as motor driver IC’s to control the gauges and small MOSFET’s to switch the warning lights and anything else I needed to get it working. Done in that way I could interface almost anything to the Arduino and make the cluster behave however I wanted.

I started looking into what wiring the cluster had normally to see if I could hack into anything directly and not have to fake signals, say a nice direct tachometer connection I could use, but found that virtually everything on the cluster was controlled via a canbus communications connection and this gave me other ideas.RX8 ClusterFor anyone who doesn’t know canbus is a differential communications interface used in the majority of common cars to connect all the separate devices together. It is what’s called multi drop and as such all the devices are basically just daisychained on a single pair of wires. Complexity is the data is sent to a specific target device based on a device ID which we don’t know and the format the device needs the data in is to give a particular result is entirely up the manufacturer. So for example even if you found the memory location that controls RPM it might be using a single byte (256 possible values) to represent RPM in the range of 0-7500 rpm. This means that each increment would be a step of approximately 30 rpm which would likely not be noticeable. Or they might use two bytes at different addresses which combine to give the value, or something more complicated! Figure it all out and you can directly control the cluster!

The Arduino can be made to communicate with a canbus system with appropriate components added on. These are available as an off the shelf canbus shield and if you’ve not build circuits like this before I recommend that approach but since I have an electronics background I decided to DIY my own and save the money and so I started down the route of designing a canbus interface. I then had another interesting thought, if I had an engine ECU for the new engine it would be transmitting all sorts of data about what it was doing which would normally go to the cluster of the car it was from. I could work out what address it was sending that data too I could read it all. So suddenly one canbus interface grew to a pair of them so I could connect one to the engine ECU and one to the cluster and eventually use the pair of interfaces to bridge the two canbus connections and convert and reformat all the engine data in real time to control the cluster. Sounds simple right!

Based on information found via Google the chips to use seemed to be the MCP2515 transceiver and MCP2551 canbus line driver. Part of the reason behind this was there are well documented libraries available for the Arduino to work with these, plus they are available in DIP packages to make prototyping on stripboard easier!

Sadly I can’t seem to find the original circuit diagram I drew for this but it was closely based on this one (click to enlarge):Arduino MCP2515 Interface

I tend to use Arduino nanos in my projects, they are very small but have a good clock speed and all the handy features you’re likely to need for fairly small IO count projects. Plus you can buy the knock off version on eBay for very little, my last ones were 5 for £12 delivered next day but can be had for less if bought from a Chinese seller but obviously with a much longer delivery. The down side of these is they make them cheaper by not using the proper FTDI branded USB to serial converter chip, instead they use the CH340G which means the driver isn’t included with the normal Arduino IDE and must be downloaded and installed manually. The appropriate driver can be found from a number of sources via Google.

After quite a bit of work I ended up with something that looked a bit like this (ok, exactly this!)

Arduino Canbus adapter top Arduino Canbus adapter bottom

The red and black coloured solder lines are to distinguish the 5V power from the Arduino from everything else to make sure I hadn’t accidentally shorted  it out. Needless to say there’s quite a bit going on on the bottom of this board! The converter board has options for either screw terminal connectors or the 9 way DSUB used for certain applications. I’ve also included options for connecting power into the DSUB if required. On particularly important feature is the termination resistor, this is situated next to the blue jumper, moving the jumper turns this on or off. Canbus must have this termination resistor connected between the two bus wires (called CANL(-) and CANH(+)) at each end of the bus, so if this is an end node on the bus it needs enabling. If it’s being added to the middle of an existing bus it should be disabled. Other keen people will notice there’s only one Arduino slot occupied, this is because by the time I took the photo it had been commandeered for another project but since I was still working with identifying signals in a single bus at a time it didn’t really matter. I did initial test with two Arduinos connected via canbus  with one transmitting and one receiving just to prove the hardware out.

Next up we need to connect the new hardware up to the RX8 cluster. This assumed it is disconnected from the car, if it isn’t you won’t need to tie in power to the cluster but I have no idea how the but will behave in this situation. If you experimenting as I am it’s advisable to disconnect the canbus pins to avoid problems or just disconnect the whole cluster. to make this work we need to use the smaller connector on the back only. In the diagram above you can see the pinout for this, the simple version is :

Upper Row going left to right
Spare
Spare
B/Y – Ignition Switched +12V
B – 0V (PSU Minus)
L/R – Permanent +12V
Spare

Lower Row
G/B – CANL
L/W – CANH
Spare
G/Y – Unknown
BR/B – Unknown
R/Y – Unknown

For testing purposes both +12V can be connected together and any normal 12VDC PSU (cheapo wall wart or anything else you have) can be used. Congratulations, you now have a powered up cluster you can work with!

Things will get technical in the next section Canbus #2

RX8 Project – Part 4, The New Engine

Following part 3 where the original rotary engine proved to be a lost cause I decided to research possible engines  that could be swapped in but there were a few criteria and limitations I had:

Size – The RX8 has a reasonable size engine bay overall but due to the size and position of the standard engine there are some limiting factors to consider. I’m aware others have swapped V8’s (among others) into RX8 shells but this generally involves extensive modification of the engine bay, steering rack and even front cross member due to the length of the engine.

Weight – The RX8 is famous for being very balanced largely due to the compact size and resulting low mounting position of the standard engine. No standard piston engine will quite match up but I wanted to get as close as reasonably possible.

Power – The standard RX8 was available with either 192 or 231 bhp and so I wanted to get to ideally the upper figure (even though mine actually started as the lower 192 model) or even exceed it if possible.

Cost & availibility – I wanted  and engine that was cheap to buy and for which spares were cheap and readily available. This was always intended to be a budget project to swap the engine more cheaply than replacing it.

After considering a huge number of options from things people have done before (VW 1.8t engine) to completely off the wall ideas that would probably upset all the RX8 purists (1.9 turbo diesel?) I eventually came across a couple really  promising candidates – the Mazda KLDE and Ford AJ series engines. These are both very compact aluminium construction V6’s which should be short enough that no modification to the front cross member should be needed. It became apparent pretty quickly that the KLDE was hard to find and attracted a comparatively high price so I ruled this out.

The AJ V6 is related to the older KLDE and is available in a few flavours. It was produced as the AJ25 and AJ30 (2.5 and 3.0 litre respectively) and were used in a a range of cars in slightly different configurations including the Ford Mondeo ST220 (along with US Contour and Taurus), Jaguar S-type and X-Type along with several others. Some (including the S-type version) have VVT.

S-type V6
S-type V6

So after an eBay search and a hard earned £165 (including delivery) later I had this prime example of an AJ25 from an S type Jag sat on my driveway. At this stage I went for the 2.5L because the 3.0L version attracts a more premium price and since I had no real idea if it I would ever get it all together I bought the cheap version. Since the block is identical for both the logic was if I made one fit and decided I just didn’t have enough power I could swap all the custom parts over to a 3.0. Clearly there’s a lot of extraneous parts on here I won’t be using and once much of this is stripped the true compact size of the engine is a bit clearer.

Stripped AJ25
Stripped AJ25

There are a few reasons I picked this version of this engine. One was that the Mondeo version, which is more common, has the water pump driven from and extended camshaft on the rear of the engine because in the Mondeo the engine is in a transverse orientation. To fit the engine to the RX8 the engine will need to be installed longitudinally and the rear will have to be very close to the firewall so this is a non-starter. The Jag version has the water pump front mounted so avoids this problem. The Jag version also includes direct acting mechanical bucket cam followers and VVT. Sadly the 2.5L generally only offers 200bhp in this configuration so it’s a little down on where I really wanted to be but the torque is 240 Nm compared to the 211 Nm peak of the 231 bhp RX8 and a considerably wider torque band so it should still go well.

Around this time I found out that the Noble M12 uses this same 2.5L engine running as a twin turbo at 325 bhp. The later M400 uses the 3.0L version of the engine but they again two turbos to it and get something in the order of 425 bhp out of it with minimal additional modifications. Reports from Noble suggest it is capable of even more but was limited because they were planning on upping the power later selling this as  another model but due due to the change of direction and ford taking the engine out of production this never happened. More info can be found here : Noble M12 History

I also made the decision to keep the RX8 gearbox so I could retain the standard carbon prop shaft in the RX8 so next up is the challenge of making an engine made by Ford, which was salvaged from a Jag, fit the gearbox from a Mazda!

More in part 5…