
So now we have a powered up RX8 cluster and some Canbus hardware that we can talk to we can start doing a few interesting things with our new setup.
Fire up the Arduino IDE and we can start writing our basic controller code. Canbus devices have a device address and a memory location for all the required data so we need to work all of these out. This is a lot easier for digital IO than the more complicated analog values because digital IO are just either set bit on or off whereas analog values can have funny scaling and things going on. I initially used a canbus demo program which worked because I basically cloned the Arduino Canbus shield. Plenty of starter guides and information can be found here : https://learn.sparkfun.com/tutorials/can-bus-shield-hookup-guide
My initial approach involved setting the target address for the Canbus transmission and sending patterns of bits high and low and see what happens. Google told me that the cluster Canbus interface operates on 500 kHz clock so with that information we should get a connection.
#include <Arduino.h>
#include <mcp_can.h>
#include <mcp_can_dfs.h>

#define CANint 2
#define LED2 8
#define LED3 7

MCP_CAN CAN0(10); // Set CS to pin 10

void setup() {
 // put your setup code here, to run once:
 Serial.begin(115200);
 Serial.println("Init…");

Serial.println("Setup pins");
 pinMode(LED2, OUTPUT);
 pinMode(LED3, OUTPUT);
 pinMode(CANint, INPUT);

Serial.println("Enable pullups");
 digitalWrite(LED2, LOW);
 Serial.println("CAN init:");

 if (CAN0.begin(CAN_500KBPS) == CAN_OK)
 {
 Serial.println("OK!");
 }
 else
 {
 Serial.println("fail :-(");
 while (1)
 {
 Serial.print("Zzz… ");
 delay(1000);
 }
 }

Serial.println("Good to go!");
}

unsigned char offarray[8] = {0, 0, 0, 0, 0, 0, 0, 0}; // Always Off Array
unsigned char onarray[8] = {255,255,255,255,255,255,255,255}; // Always On Array

void loop() {
 // put your main code here, to run repeatedly:

for (int i=0; i <= 512; i++){
  for (int l=0; l <= 10; l++){
    for (int j=0; j <= 100; j++){
       CAN0.sendMsgBuf(i, 0, 8,offarray);
       delay(10);
     }

     for (int k=0; k <= 100; k++){
     CAN0.sendMsgBuf(i, 0, 8,onarray);
     delay(10);
     }
   }
  }
}
So this loop will iterate through 512 addresses strobing all 8 bytes high and low on 1 second intervals. The trick here is that canbus needs regular packets to stay active, so we can’t just send a value once. In this case each value (high or low) is send 100 times at 10ms intervals so the cluster should stay active long enough to see if anything is happening. Each address will get 10 cycles of high and low before moving onto the next address. In concept this would work and provided ‘i’ is set to increment high enough you would cover all the addresses. Bear in mind at this rate you’d have to watch it for about 90 mins…
Thankfully around the time I started running though this trying to find any useful addresses I came across this :
https://www.cantanko.com/rx-8/reverse-engineering-the-rx-8s-instrument-cluster-part-one/
This nicely tied in with the hardware I was working on and so the code and information is all exceedingly useful and saved me a lot of time. Specifically it gives the address locations for most of the indicators on the cluster which is what we really need.
After lots of trial and error I managed to come up with a block of code that can control the cluster but easily allow me to set any warning light I need on the dash, or more accurately also to turn off all the warning lights. Something that will be essential come MOT time as a warning light that stays on is an MOT fail and since most of the systems that control them will no longer be in the car (primarily the original ECU).
#include <Arduino.h>
#include <mcp_can.h>
#include <mcp_can_dfs.h>


#define COMMAND 0xFE
#define CLEAR 0x01
#define LINE0 0x80
#define LINE1 0xC0

#define CANint 2
#define LED2 8
#define LED3 7

#define NOP __asm__ ("nop\n\t")

// Variables for StatusMIL
bool checkEngineMIL;
bool checkEngineBL;
byte engTemp;
byte odo;
bool oilPressure;
bool lowWaterMIL;
bool batChargeMIL;
bool oilPressureMIL;

// Variables for PCM
byte engRPM;
byte vehicleSpeed;

// Variables for DSC
bool dscOff;
bool absMIL;
bool brakeFailMIL;
bool etcActiveBL;
bool etcDisabled;


MCP_CAN CAN0(10); // Set CS to pin 10

void setup()
{

    //Serial.begin(115200);
    //Serial.println("Init…");
    //Serial.println("Setup pins");

    pinMode(LED2, OUTPUT);
    pinMode(LED3, OUTPUT);
    pinMode(CANint, INPUT);

    //Serial.println("Enable pullups");
    digitalWrite(LED2, LOW);
    //Serial.println("CAN init:");

    if (CAN0.begin(CAN_500KBPS) == CAN_OK)
    {
        //Serial.println("OK!");
    }
    else
    {
        //Serial.println("fail :-(");
        while (1)
        {
            //Serial.print("Zzz… ");
            delay(1000);
        }
     }

Serial.println("Good to go!");
}

unsigned char stmp[8]       = {0, 0, 0, 0, 0, 0, 0, 0};                         // Always Off Array
unsigned char otmp[8]       = {255,255,255,255,255,255,255,255};                // Always On Array

unsigned char statusPCM[8]  = {125,0,0,0,156,0,0,0};                            // Write to 201
unsigned char statusMIL[8]  = {140,0,0,0,0,0,0,0};                              // Write to 420
unsigned char statusDSC[8]  = {0,0,0,0,0,0,0,0};                                // Write to 212

unsigned char statusEPS1[8] = {0x00,0x00,0xFF,0xFF,0x00,0x32,0x06,0x81};        // Write to 200 0x00 00 FF FF 00 32 06 81
unsigned char statusEPS2[8] = {0x89,0x89,0x89,0x19,0x34,0x1F,0xC8,0xFF};        // Write to 202 0x89 89 89 19 34 1F C8 FF

unsigned char statusECU1[8] = {0x02,0x2D,0x02,0x2D,0x02,0x2A,0x06,0x81};        // Write to 215 - Unknown
unsigned char statusECU2[8] = {0x0F,0x00,0xFF,0xFF,0x02,0x2D,0x06,0x81};        // Write to 231 - Unknown
unsigned char statusECU3[8] = {0x04,0x00,0x28,0x00,0x02,0x37,0x06,0x81};        // Write to 240 - Unknown
unsigned char statusECU4[8] = {0x00,0x00,0xCF,0x87,0x7F,0x83,0x00,0x00};        // Write to 250 - Unknown


/*

215 02 2D 02 2D 02 2A 06 81 // Some ECU status

231 0F 00 FF FF 02 2D 06 81 // Some ECU status

240 04 00 28 00 02 37 06 81 // Some ECU status

250 00 00 CF 87 7F 83 00 00 // Some ECU status

*/


void updateMIL()
{
    statusMIL[0] = engTemp;
    statusMIL[1] = odo;
    statusMIL[4] = oilPressure;

  if (checkEngineMIL == 1)
  {
    statusMIL[5] = statusMIL[5] | 0b01000000;
  }
  else
  {
    statusMIL[5] = statusMIL[5] & 0b10111111;
  }

    if (checkEngineBL == 1)
  {
    statusMIL[5] = statusMIL[5] | 0b10000000;
  }
  else
  {
    statusMIL[5] = statusMIL[5] & 0b01111111;
  }

   if (lowWaterMIL == 1)
  {
    statusMIL[6] = statusMIL[6] | 0b00000010;
  }
  else
  {
    statusMIL[6] = statusMIL[6] & 0b11111101;
  }

     if (batChargeMIL == 1)
  {
    statusMIL[6] = statusMIL[6] | 0b01000000;
  }
  else
  {
    statusMIL[6] = statusMIL[6] & 0b10111111;
  }

       if (oilPressureMIL == 1)
  {
    statusMIL[6] = statusMIL[6] | 0b10000000;
  }
  else
  {
    statusMIL[6] = statusMIL[6] & 0b01111111;
  }
}

void updatePCM()
{
    statusPCM[0] = engRPM;
    statusPCM[4] = vehicleSpeed;
}

void updateDSC()
{
  if (dscOff == 1)
  {
    statusDSC[3] = statusDSC[3] | 0b00000100;
  }
  else
  {
    statusDSC[3] = statusDSC[3] & 0b01111011;
  }

    if (absMIL == 1)
  {
    statusDSC[4] = statusDSC[4] | 0b00001000;
  }
  else
  {
    statusDSC[4] = statusDSC[4] & 0b11110111;
  }

      if (brakeFailMIL == 1)
  {
    statusDSC[4] = statusDSC[4] | 0b01000000;
  }
  else
  {
    statusDSC[4] = statusDSC[4] & 0b10111111;
  }

     if (etcActiveBL == 1)
  {
     statusDSC[5] = statusDSC[5] | 0b00100000;
  }
  else
  {
    statusDSC[5] = statusDSC[5] & 0b11011111;
  }

    if (etcDisabled == 1)
  {
    statusDSC[5] = statusDSC[5] | 0b00010000;
  }
  else
  {
    statusDSC[5] = statusDSC[5] & 0b11101111;
  }


}

void loop()
{
    // StatusMIL
    engTemp         = 145;
    odo             = 0;
    oilPressure     = 1;    // Either 0 (fault) or >=1 (Ok)
    checkEngineMIL  = 0;
    checkEngineBL   = 0;
    lowWaterMIL     = 0;
    batChargeMIL    = 0;
    oilPressureMIL  = 0;

    updateMIL();
    CAN0.sendMsgBuf(0x420, 0, 8, statusMIL);
    delay(10);


    // StatusPCM
    engRPM          = 60;    // RPM  Value*67 gives 8500 RPM Reading Redline is 127
    vehicleSpeed    = 93;    // Speed  Value=0.63*(Speed)+38.5

    updatePCM();
    CAN0.sendMsgBuf(0x201, 0, 8, statusPCM);          //CAN0.sendMsgBuf(CAN_ID, Data Type (normally 0), length of data, Data
    delay(10);

    // StatusDSC
    dscOff          = 0;
    absMIL          = 0;
    brakeFailMIL    = 0;
    etcActiveBL     = 0;    // Only works with dscOff set
    etcDisabled     = 0;    // Only works with dscOff set

    updateDSC();
    CAN0.sendMsgBuf(0x212, 0, 8, statusDSC);
    delay(10);

/*
    CAN0.sendMsgBuf(0x200, 0, 8, statusEPS1);
    delay(10);

    CAN0.sendMsgBuf(0x202, 0, 8, statusEPS2);
    delay(10);


    CAN0.sendMsgBuf(0x215, 0, 8, statusECU1);
    delay(10);

    CAN0.sendMsgBuf(0x231, 0, 8, statusECU2);
    delay(10);

    CAN0.sendMsgBuf(0x240, 0, 8, statusECU3);
    delay(10);
    CAN0.sendMsgBuf(0x250, 0, 8, statusECU4);
    delay(10);

*/

 }
This is the current latest version of the code I have, the serial comms section at the start is handy for checking you have a working connection but if you don’t have the serial monitor open it will cause the Arduino to hang at the transmit instruction and not get as far as updating the canbus so I recommend enabling these initially but once you get a working connection comment them back out as above. There are also sections above taken directly from the Cantanko page to deal with the power steering controller and some other bits, I haven’t tried these yes as the cluster isn’t in a car but I plan do so at some stage.
This code has some limitations in this form, basically the warning lights etc are set in the code as static values so this code will just set everything normal and all the lights I have addresses for to off. One particular curiosity is the way the cluster treats the oil pressure value. The data space actually has a whole byte for a value here but the cluster only only has two values despite having an actual gauge, a value of 0 drops the needle to the bottom, a value of 1 or more sets the gauge to normal. My feeling on this is the car was originally intended to have a proper oil pressure transmitter but someone decided it was too expensive and a normal pressure switch was used instead and rather than redesign the cluster they just changed the scaling in the on board microcontroller to behave as described. long term I’d love to mod the cluster to add the analog functionality back in but without the code for the controller this would probably involve disconnecting the original drive to that gauge and adding another Arduino inside the cluster just for driving that gauge. It seems like a lot of work to know oil pressure on a scale of low to high!
The code also sets a speed and RPM however the ODO and trip meters will not increment as it stands – I purposefully left this bit of code out because it’s only really applicable if you’re on an actual car otherwise your cluster will just keep clocking up. The ODO and trips seemed to be the one bit no-one else had managed to do or identify but after quite a few hours of testing random blocks will various combinations of high and low as well as sending incrementing / decrementing values I noticed my trip meter had actually moved up by 0.1 miles which meant something was working. I eventually managed to trace it to the address listed above. The trick to actually making it work is that the value in the byte is irrelevant to what the cluster displays, so no this doesn’t let you clock it back! What it appears to do is counts the changes to the value so I made it work by setting up a loop of code that keeps changing this value up to a certain number to give a specific distance. Turns out the cluster needs to see 4140 changes per mile. Eventually I plan to tie this in to the speedometer value so only one value needs to be set, by knowing the pulses per mile and the speed we can work out the time delay between each change. As an example at 100mph we need to send 115 changes per second, this is one every 8.7ms which is obviously faster than the loops above and so for speed and accuracy would have to be hardware timed with an interrupt to do the update at the right speed. I’ll probably do an updated version at a later date.
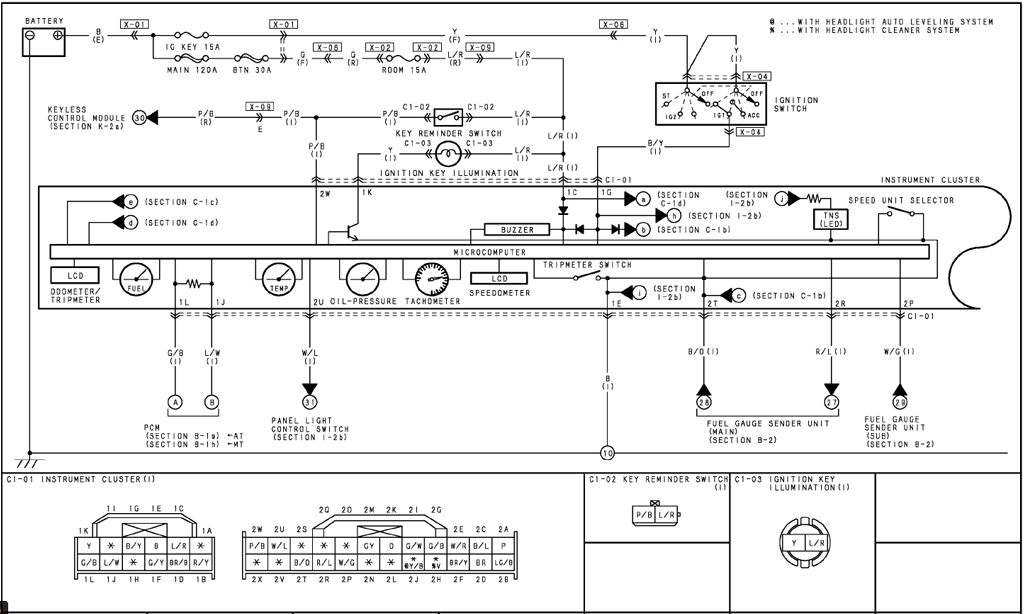
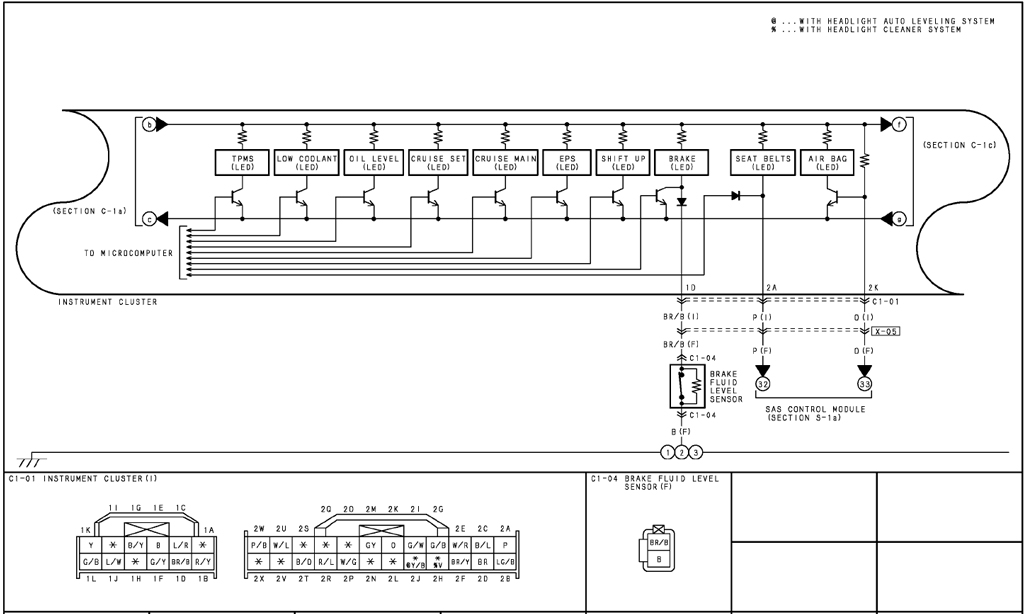
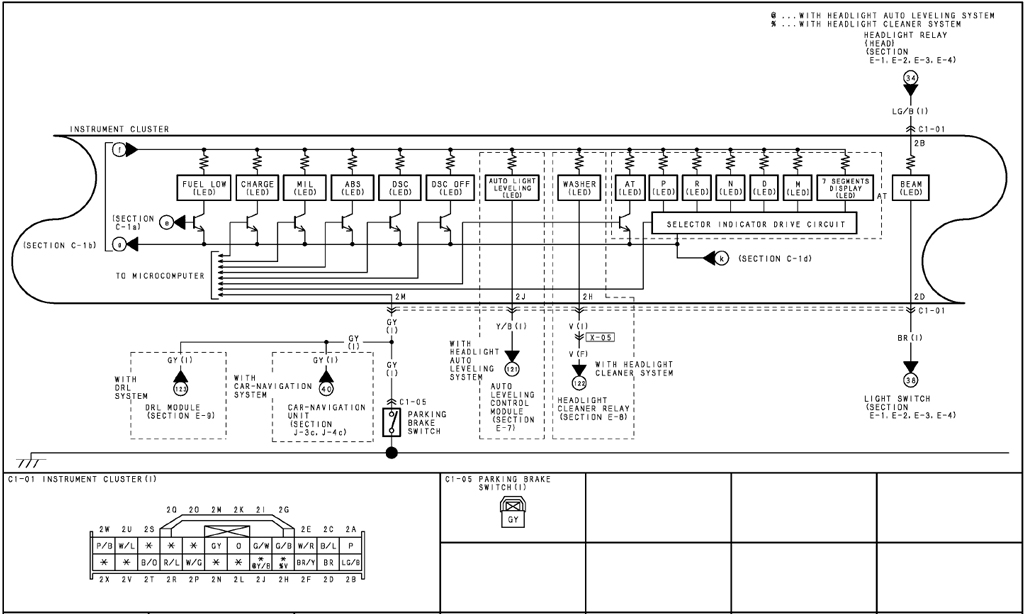
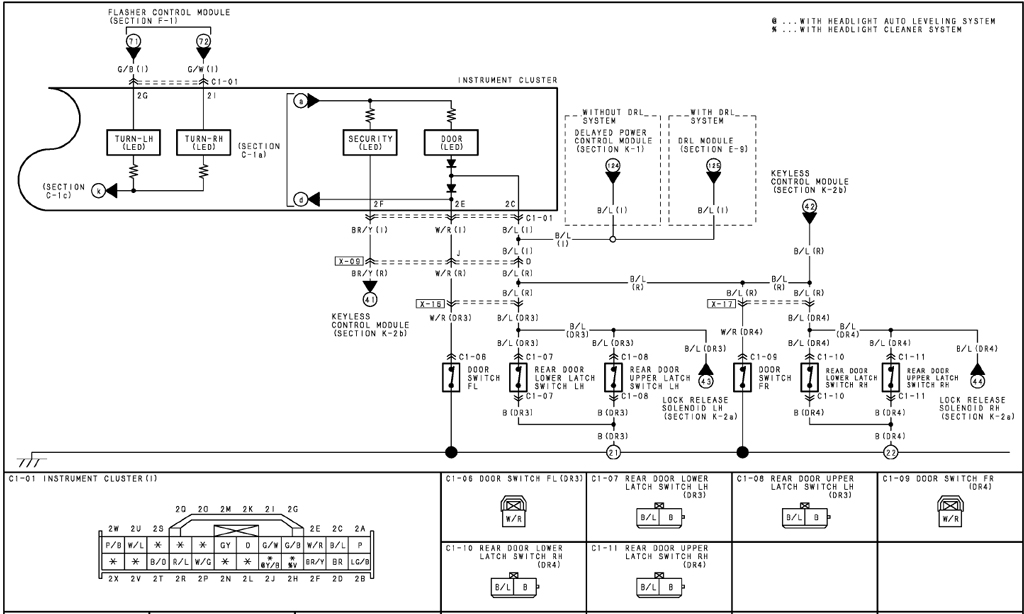
There’s a couple other things I need to sort out, the airbag warning light being the prime one because this is an outright MOT fail. Now in theory when it’s back on the car it should work just fine as the airbag wiring is all there but I figured it was worth working out anyway. So after working through all of the RX8 cluster wiring diagrams (1)(2)(3)(4) I pieced this together :
This covers the majority of everything someone might need to use the cluster on a simulator apart from the fuel gauge. The RX8 fuel gauge is a bit of an oddity because the car uses a saddle shaped fuel tank to allow it to clear the driveshaft and so it has two senders denoted as ‘main’ and ‘sub’.

Each of these apparently has a resistance value of between about 325Ω at the bottom and 10Ω at the top. There seems to be some questions about how this system works out what to display based on the two sender values and whether it expects to see one remain full while the other empties or something similar. Unfortunately I’ve not played with it much because I’ve don’t actually need to make this work off the car (since the car will have the senders but I can say putting 100Ω a resistor between both 2R-2P and 2R-2T gives a value of about 1/3 of a tank and 9Ω (because I just added a 10Ω on along side the existing 100Ω) across these connections gives a full tank reading (actually a little above full) so as long as you move both together it works fine, this is ok if all you want to do is get the fuel warning light off for a driving simulator but not that helpful for a single fuel sender conversion which is why most people are interested. If I get chance I’ll investigate further. Also for some reason it takes an absolute age to move up the scale which is a bit unfortunate but I suspect is as intended. At least it should be stable!
All of that leaved us with just one light I can’t get to turn of, the warning light for the electronic power steering. This is controlled via canbus by the look of the circuit diagram but as yet I’ve not found the address for it. If anyone knows the address please leave a comment! Else I will have to go back to either trial and error or the really dodgy backup plan which involves cutting the tracks in the cluster and doubling up on another warning light which isn’t used much! Maybe I should just add another controller in the cluster!
So hopefully that gives you (almost) everything you need to know about making the cluster work! We might get back to mechanical things in the next update…