So having started putting information on here there has been something of a gap in progress to to various other projects getting in the way, a problem I’m sure others will sympathise with!
On thing that’s been keeping us all busy of late is our house (which is a very old ex pub) appeared to have something of a woodworm, nothing too serious but a problem we wanted to rectify while we still had as little stuff as possible to do any harm to! Anyway the outcome of this was we needed to treat the entire attic and first floor meaning we had to remove all of the floorboards on the first floor and clear all the attic space, in total something like 200m², so let the chaos begin!
So the story begins with dust, not just any dust but the sort of residue you get after a building has been left for upwards of 200 years, this stuff is awful, if you have have to deal with it you’ll understand what I mean! It WILL get everywhere, I’ve previously used those cheapo disposable masks and have found that while they more or less work as soon as you start moving about a bit they either fall off or lift away from your face enough to leak and not do anything. My feeling on this is if you ever have to do anything like this it’s worth splashing the cash a bit on a half decent one. Personally I bought 3 of these : http://www.screwfix.com/p/site-reliance-28-day-half-mask-respirator-ffp2/1232j
They seemed to fit well as they are flexible rubber and have replaceable filter elements. There are plenty of other options that should also be fine, out of preference I would just avoid the cheapo ones. This was around the time we realised the better masks were a good idea.

Adding to the above, safety goggles! When you start ripping apart a building things will start flying, be they intentional or not! In our case we had to add a new loft hatch to one end of the building to allow access. the building being rather old and actually still has old style plaster and lath. This is where lots of small sticks are nailed onto the beams and the plaster would be pressed through between the sticks where it will curl round the back of them and set holding the plaster in place. This works very well if left untouched but sadly it’s rather fragile if it is ever disturbed the back half separates from the front and the plaster peels off the ceiling! The problem here being if you start cutting through it you will get covered in an torrent of plaster, horrible black dust, splinters, nails and anything else that’s previously been left all over the attic. We had big lumps plaster, concrete and even daub (as in wattle and daub)! Goggles are not just a good idea in this case, I rank them as essential! This is a chunk of daub we found in the attic, it’s about a foot wide…Admittedly if this fell on you goggles would only help to a limited degree!

So now next up we had two old galvanised steel water tanks up there that were long since taken out of use. Somehow, I’m not sure how, the tanks were about double the size of the hatch we had to get them through. The obvious answer to this was to make the tanks half the size! So knowing this I got tooled up and got to it. First off I tried a 4.5″ angle grinder, while it kind of worked sparks flew everywhere as expected and after cutting 6 inches or so the first cutting disk was gone. If you ever try this I recommend having a second person to hand with a fire extinguisher. you will also need plenty of cutting disks, or ideally a larger diameter grinder may work better! After my first disk I abandoned the grinder and went for a reciprocating saw, specifically this one. These are a very aggressive tool but highly effective. To be honest on these it was like a (very noisy!) hot knife through butter. In total for the two tanks I wore out one already part used blade, bent a second one that it turned out I had previously ruined and had to do the last couple inches with a new one – In hindsight I should’ve just started with the new blade!
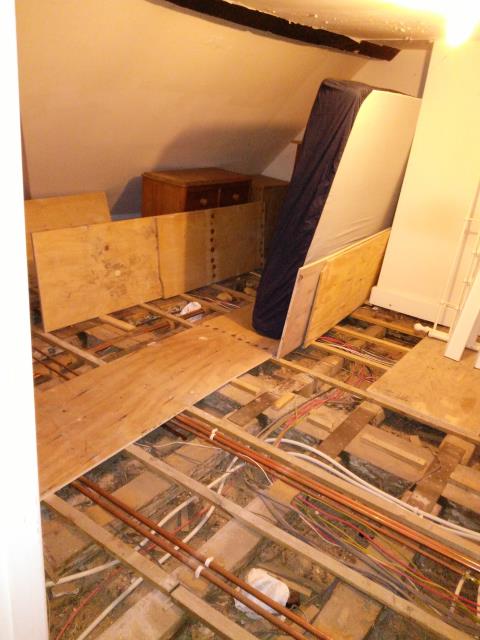
So back to ripping up the floor, just as a quick example of what chaos we’re talking about here, so this is the master bedroom as :

And here’s another bedroom, after insulation was installed in the floor. In most houses this really isn’t necessary but in this case it has quite a few benefits. Firstly being an old building it has a lot of drafts from pretty well everywhere, there are large gaps around sections of the floor allowing all the warm air from the ground floor to escape upstairs, plus any noise passes right through.

Hopefully that will solve a lot of these problems, we also packed felt sleeving (I bought some of this, it comes as a tube which isn’t ideal but it can be cut open or if the pipes are really close just wedged between them pressed flat as a double layer between to stop them clanking as they change temperature.
Anyone looking at this and thinking there’s a lot of pipes and cables in there, you’re right! Being an ex-pub everything is wired separately so we have quite a lot of individual sockets which have their own circuit breakers and other related things which would be excessive in a house but in a business where you don’t want one faulty appliance to trip out all the power it becomes worth the additional cost and effort!
The other thing we’re working on is adding a networking cupboard to tidy up all of our wiring and to add a number of wireless access points to have internet all over the building. Being old and stone construction wifi doesn’t exactly travel far so we need to do something a little more serious than the average wifi router! I suspect that’ll be another blog another day!